When we need to access home devices that are behind a router, we encounter at least two problems:
- The public IP address of the home router might change from time to time (especially after each reboot), so that one might need to keep track of the IP address all the time;
- Most home devices do not have a public IP address for external access.
The first problem can be solved by using a free DDNS (dynamic DSN) service, while the second one by a free and open-source VPN (virtual private network) system.
DDNS
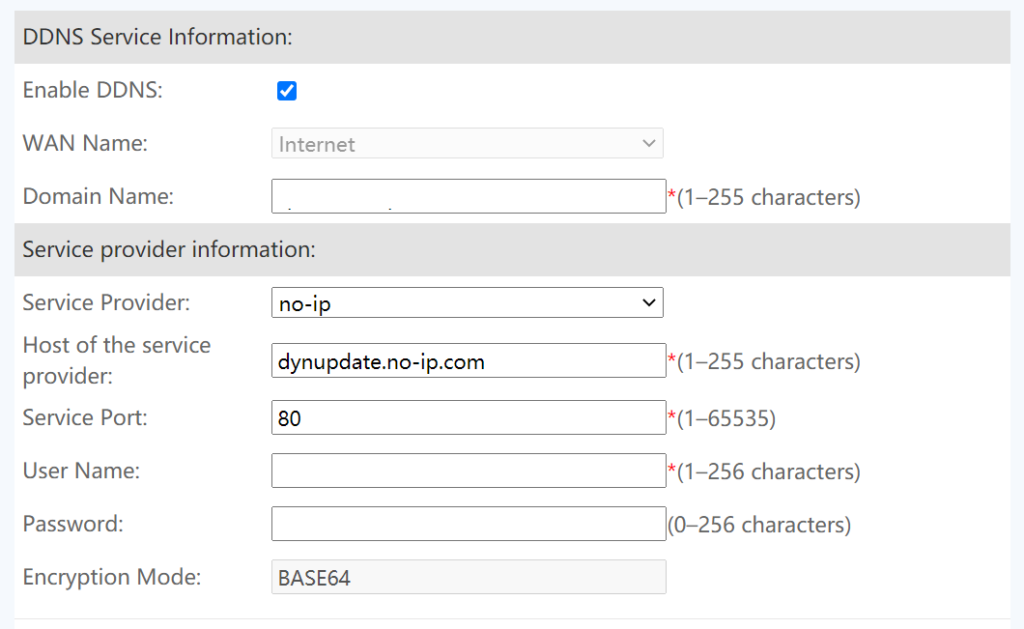
In most cases, the public IP address assigned to a home router by ISP provider is dynamic, and is changed if the router is rebooted or in some other situations. If we refer to the router by its public IP address, then we need to keep track of the changes made to it, which is unconvenient. To solve this problem, we can take advantage of free DDNS (dynamic DNS) service, by creating a free account in one of the free service providers, such as dynu, no-ip and Duck DNS and then add a domain by using dynu. Note that the domain created in no-ip needs to be manually renewed for every 30 days, while the other two providers do not have this restriction. Most of these providers automatically detect the current public IP address of the home router and link it to the created domain.
The above operation only links the current IP address to the domain. We then need a way to update the link automatically and regularly, so that the link becomes aware of any change of the IP address of the home router . There are at least two ways to set up such automatic updates.
Method 1: Use CRON
We utilize cron to run a small piece of script that updates the DDNS service provider (e.g., dynu) with the current public IP address every five minutes in our Raspberry device (running a linux system), as follows; see also the instructions from Duck DNS and dynu.
First, install curl and cron if they haven’t been installed yet.
sudo apt-get update
sudo apt-get install -y cron curl
Next, create a directory dedicated to Duck DNS and a file inside it with file name duckdns.sh.
mkdir ~/duckdns
cd duckdns
nano duckdns.sh
Copy the following content into the file duckdns.sh:
echo url="https://www.duckdns.org/update?domains=xxx.duckdns.org&token=a7c4d0ad-114e-40ef-ba1d-d217904a50f2&ip=" | curl -k -o ~/duckdns/duckdns.log -K -where the domain xxx.duckdns.org and the token a7c4d0ad-114e-40ef-ba1d-d217904a50f2&ip= is to be replaced with your domain name and your token obtained from your Duck DNS account when you add the domains. Save the file duckdns.sh.
Next, make the file duckdns.sh executable and make the script run every 5 minutes by the following commands.
sudo chmod 700 duckdns.sh
sudo crontab -e
select an editor (e.g., nano), and then paste the following to the bottom of the crontab, and finally save the file.
*/5 * * * * ~/duckdns/duckdns.sh >/dev/null 2>&1To check everything is set up properly, we run the script manually by the command sudo ./duckdns.sh and then check the status by cat duckdns.log.
The update for dynu and other service providers might be set up in a similar way. Note that dynu requires a password instead of token, e.g., the content in the .sh file shall look like
echo url="https://api.dynu.com/nic/update?username=USERNAME&password=PASSWORD" | curl -k -o ~/dynudns/dynu.log -K -where USERNAME and PASSWORD are replaced with the username and password of your dynu account.
Method 2: DDNS Function Provided by Routers
If the home router supports DDNS function, then the update process can be simplied by using any supported free DDNS service, such as no-ip. For example, in a Huawei optical router, DDNS service by no-ip is supported. Add an entry by using the following form, the router will send an update to no-ip regularly; configuration to other service providers is similar.
Method 3: Using ddclient
This methods requires to install the ddclient first, by the comand sudo apt install -y ddclient. During the installation you might be asked for a configuration. Such configuration can be changed by modifying the configuration file /etc/ddclient.conf after installation. The configuration is specific to DDNS providers. For example, if a domain is obtained from namecheap, then the configuration can be found here. To start the ddclient servier at system startup, follow the guide here.
OpenVPN
In a normal home network environment, devices are connected to a home router in an either wired or wireless way. Only the router has a public IP address that can be accessed directly from outside of the home network. Other devices have a local IP address only and thus are not directly accessible from outside. However, in some cases, we might need to access them when we are out of home in a secure way, e.g., only we can access, not someone else. A promising solution is setting up a home VPN (virtual private network) server. Among many softwares that can serve the purpose, OpenVPN is a very popular private network system that includes both server and client components. It is free, open-source, and ideal for home network.
Install and Set Up OpenVPN Server
Perhaps the easist way to install OpenVPN is via the following commands, thanks to an installation script developed by angristan.
curl -O https://raw.githubusercontent.com/angristan/openvpn-install/master/openvpn-install.sh
sudo chmod +x openvpn-install.sh
sudo ./openvpn-install.sh
The installation script requires some input.
- IP address of the network interface that we want OpenVPN listening to. In our setup, the Raspberry device is behind a home router (acting as NAT), and the address we need to provide to the script is the local IP address. Note that if the Raspberry device is connected to the network via both ethernet cable and WiFi, it has two interfaces and thus two local IP addresses, and we need to decide which one to use. We recommend the one associated with the ethernet interface for stabler connection.
- Public IP address or hostname. For the IP address option, it is the public IP adress of the router, and for the hostname option, it is the domain name that we obtained from a DDNS service provider. The installation script will automatically detect the public IP address. However, we recommend to use the hostname option.
- IPv6 support. We can simply enable the support.
- Port to listen to. We go for the default one, which is 1194.
- Protocol to use. We follow the recommendation to use UDP.
- DNS resolvers. Again, we follow the recommended option.
- Compression. No.
- Encryption. We can customize encryption setting in the following.
- Cipher for data channel: AES-256-CBC or AES-256-GCM
- Certificate: ECDSA
- Curve for certificate’s key: prime256v1
- Cipher for control channel: ECDHE-ECDSSA-AES-128-GCM-SHA256
- Diffie-Hellman key: ECDH
- Curve for ECDH key: prime256v1
- Digest algorithm: SHA-256
- TLS: tls-crypt
Now, the installation script is ready to install and set up OpenVPN. Once it is done, it will ask you to create a client by providing it the client name, and then ask you whether you want to protect the client configuration file with a password. If password protection is used, then anyone wants to use the client configuration file needs to provide the passwor, which adds additional security and thus is recommended. Remember to use a strong password.
Set Up Port Forward
Now the OpenVPN server is running in a Raspberry device that is behind a home router. As the Raspberry does not have a public IP address, it can not be accessed directly. We need to tell the router that any data sent to the port 1194 shall be forwarded to the Raspberry device. Most modern routers can be configured for data forwarding. We simply login to the home router management interface (via a mobile app or a web browser; refer to the router manual for how to login), and locate the page for configuring port forwarding. Below is the corresponding page from my router management interface. Some key information for configuration is provided below.
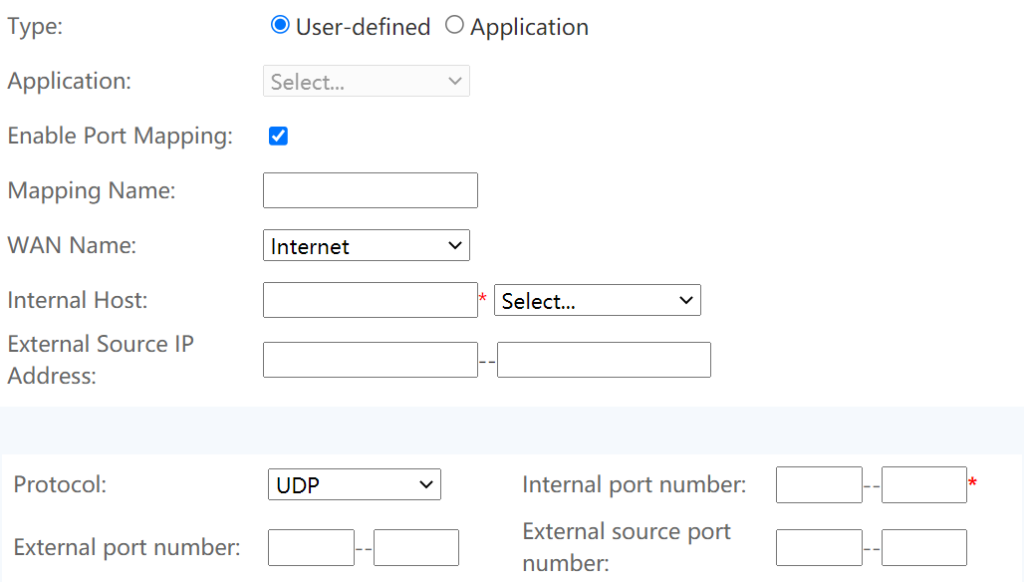
- Mapping Name: any name of your choice, e.g., OpenVPN, or simply left blank;
- Internal Host: the local IP address of the interface that the OpenVPN server is listening (set in the OpenVPN installation process)
- Protocol: UDP, unless you choose TCP during the OpenVPN installation process.
- Internal port number: 1194 if you use the default port in the OpenVPN installation process.
OpenVPN Client
If everyting goes smoothly, an xxxx.ovpn file will be created in your home directory, where xxxx is the client name provided to the installation script. To add additional clients or remove an existing client, simply run the installation script again and follow the menu and instructions. This .ovpn file can not imported to a compatible VPN client. Below we will test it in a Windows laptop.
First, we download the .ovpn file by using a SCP client, like FileZilla with
- IP address: the local IP address of the Raspberry device that runs a linux system;
- Username: your linux username;
- Password: the password of the linux username;
- Protocal: sftp
- Port: 22
Next, we download the OpenVPN Connect for Windows and install it. Start the client, we are then asked to import a profile which refers to a .ovpn client configuration file. There are two ways to import the .ovpn file. One is via providing a URL of the file, and the other is via a local file. We goes for the local file option, and drag and drop the .ovpn (downloaded from the Raspberry server via a SCP client). Once it is successfully imported, we start to connect to the OpenVPN server we have set up in the Raspberry device. If the .ovpn is protected by a password, then provide the password when it is requested by the OpenVPN GUI client.
To test it works, we find a mobile phone and disable the WiFi connection to force the mobile phone to use mobile data for internet connection. This way, the mobile phone is located outside the home network (even when it is physically at home!). We then create a WiFi hotspot in the mobile phone and connect the Windows laptop to the WiFi hotspot. Therefore, the laptop is also outside the home network and not able to access the Raspberry and other home devices before we connect to the OpenVPN server. For example, the remote access to the Raspberry device via SSH from the laptop by the local IP address of the Raspberry device goes nowhere. Once we turn on the OpenVPN connection, the laptop (which connects to the WiFi hotspot of a mobile phone using a data plan for internet connection) is able to access to the home network as if it were inside the home network. For example, the remote SSH access to the Raspberry device by using its local IP address works normally.
The client OpenVPN Connect is also available for iOS/Android platforms. For Android, we also recommend the free open-source client OpenVPN for Android. The setup is similar, but it addtionally allows finer controls for how your apps use VPN. For instance, it allows us to use the VPN only on some specific apps of our choice, as shown in the following picture. This feature is useful especially when the purpose of using a VPN is for some apps such as Home Assitant to access the home network.
