Home Assistant is an open-source home automation platform that allows users to locally control network-attached devices (sensors, smart appliances, etc). The platform runs in a local device and does not require a cloud to operate, and thus is able to protect users’ privacy.
Installation for Debian 10
Home Assistant can be installed to a device in either of the following ways:
- as an independent operating system (known as Home Assistant Operating System). This way, Home Assistant takes control of all resources of the device. It is recommended if Home Assistant is the only service you need to run on the device.
- as a container by using Docker. Only Home Assistant Core is available if it is installed in this way, and you are not able to use add-ons that are very useful.
- as a service on top of another operating system such as Debian (which is the only supported system).
Since we are planning to run other service in addition to Home Assistant on Debian, we choose to install Home Assistant in the third way. Specifically, we will install Home Assistant on top of Debian 10 running on a Raspberry Pi 4 device; see here for how to install Debian on Raspberry Pi 4. We primarily follow the offfical instructions and the guide specific to Raspberry Pi.
First of all, we shall install NetworkManager and use it to manage the WiFi connection of the Raspberry device by following the instructions of method 2 in the section Configure Network of my previous post about installing Debian on a Raspberry device. Note that Home Assistant requires NetworkManager to work. If the WiFi is set up by using method 1 in that section, then the system may not be able to reconnect the WiFi after the network manager service is restarted by the installation script.
Then, we prepare the Debian with some required packages, including installing Docker.
sudo apt-get update && sudo apt upgrade -y && sudo apt autoremove -y
sudo reboot

sudo apt-get install -y curl jq apt-transport-https ca-certificates gnupg lsb-release software-properties-common apparmor-utils dbus
sudo systemctl disable ModemManager
sudo systemctl stop ModemManager

curl -fsSL get.docker.com | sh
Now we install Home Assistant.
cd /usr/src
curl -Lo installer.sh https://raw.githubusercontent.com/home-assistant/supervised-installer/master/installer.sh
If you connect to the Raspberry device via remote SSH, we then recommend to use a utility software screen via the command apt-get install -y screen. It helps to keep the remote SSH session even when the network is interrupted. Once it is installed, use the commend screen to open a new SSH session managed by the utility software.
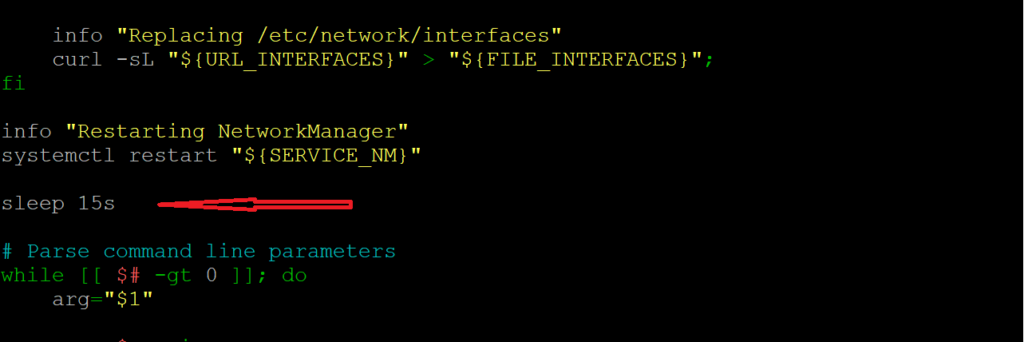
The installer.sh script will restart the NetworkManager service, which cause temporary network interruption (about few seconds). However, the script does not wait for network connection to recover before proceeding to download other components, and this might cause an error. To prevent this issue, one simple way is to put the script into sleep for a few seconds right after it restarts the NetworkManager service. For example, we can use a text editor such as nano to insert into the script a line with sleep 15s as indicated by the arrow in the following figure.
Now we are ready to run the installer script.
sudo bash installer.sh --machine raspberrypi4-64If you are using a different Raspberry Pi model, use the following command to get the machine type, and then refer to here for the corresponding machine type. Note that aarch64 is equivalent to arm64. Since we are using a Raspberry Pi device, we just need to know the Raspberry Pi model (e.g., 3 or 4) and whether it is a 32bit or 64bit machine.
uname -mType y and hit the Enter key to continue the installation process.

If you run into the following error, simply run the installer script again.

If everything goes smoothly, Home Assistant will be installed successfully with the following information that tells how to proceed further.

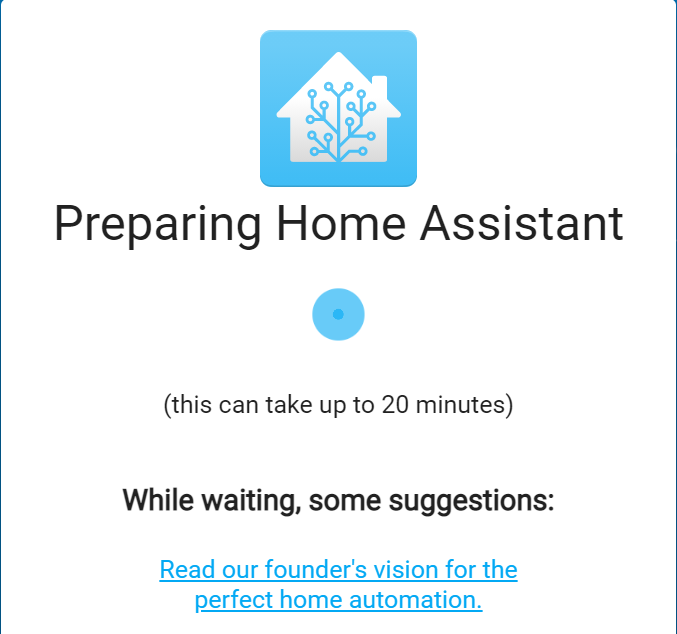
Then, in a web browser, navigate to http://xxx.xxx.xxx.xxx:8123 to start enjoying Home Assistant, where xxx.xxx.xxx.xxx is the IP address of the Raspberry Pi device. If you get the message that “This site can’t be reached“, don’t panic. Just try to refresh the page several time in a few minutes until the following page pops up. In our case, it actually took about 10 minutes.
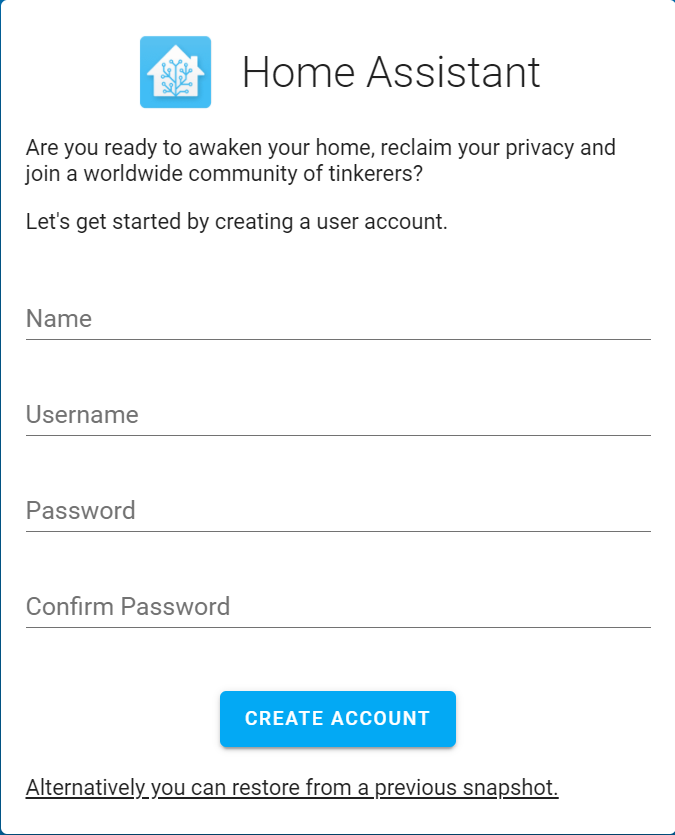
For the first visit, the Home Assistant system might take a few minutes to boot up, and then asks you to create a user before you can login, as indicated in the following figure. Here, Name is your actual name or nickname, while Username is the one you need for login.
Installation for Raspberry Pi OS (32bit)
Although not officially supported, at the time of writing, Home Assistant can be successfully installed on Raspberry Pi OS system, at least for the 32bit version. The installation is the same as that for Debian 10, except that we use a different installation script.
curl -Lo installer.sh "https://raw.githubusercontent.com/Kanga-Who/home-assistant/master/supervised-installer.sh"and the following command:
sudo bash installer.sh -m raspberrypi4Note: If you encounter the error “invalid reference format”, you might try to redo the command bash installer.sh -m raspberrypi4.
Note: You might have to run the Raspberry Pi configuration utility by sudo raspi-config and in the Advanced Options, set A1 – expand file system.
Secure and Remote Access
Remote access to devices behind a home router has been discussed one of the previous posts. If VPN is used, then no further setup is needed. Otherwise, we can configure Home Assistant for secure and remote access. As I also host other web service (via Apache2) alongside with Home Assistant, I decide to use Apache2 for reverse proxy service, as follows, assuming that Apache2 has been installed and a DDNS domain name such as smartopia.duckdns.org has been registered.
First, we set up a port forward rule with
- Mapping Name: any name of your choice, e.g., https, or simply left blank;
- Internal Host: the local IP address of the Raspberry Pi device
- Protocol: TCP
- Internal port number: 443
Next, install certbot for generating SSL certificate.
# install snap if not onboard
sudo apt install -y snapd
sudo snap install core

# remove certbot-auto and any other cerbot packages
sudo apt-get remove certbot

# install certbot
sudo snap refresh core
sudo snap install --classic certbot
sudo ln -sf /snap/bin/certbot /usr/bin/certbot
Now, we add file hass.conf to the folder /etc/apache2/site-available with the following text, where smartopia.duckdns.org is replaced with your domain name.
<VirtualHost *:443>
   ServerName smartopia.duckdns.org

   ProxyPreserveHost On
   ProxyRequests off
   ProxyPass /api/websocket ws://localhost:8123/api/websocket
   ProxyPassReverse /api/websocket wss://localhost:8123/api/websocket
   ProxyPass / http://localhost:8123/
   ProxyPassReverse / http://localhost:8123/

   RewriteEngine on
   RewriteCond %{HTTP:Upgrade} websocket [NC]
   RewriteRule ^/?(.*)  "ws://localhost:8123/$1" [P,L]
</VirtualHost>
Next, we enable some modules and restart Apache2.
sudo a2enmod proxy
sudo a2enmod proxy_http
sudo a2enmod proxy_wstunnel
sudo a2enmod ssl
sudo a2enmod rewrite
sudo a2enmod headers

sudo systemctl restart apache2
To get rid of a risk warning, we shall generate and configure a certificate.
# generate certificatie; follow the instructions
sudo certbot certonly --apache

# add the following to /etc/apache2/site-available/hass.conf
# right below the line ServerName smartopia.duckdns.org
# replace smartopia.duckdns.org with your actual domain name
SSLEngine on
SSLCertificateFile  /etc/letsencrypt/live/smartopia.duckdns.org/fullchain.pem
SSLCertificateKeyFile /etc/letsencrypt/live/smartopia.duckdns.org/privkey.pem
Restarting Apache2 service, now Home Assistant can be securely and/or remotely accessed via https://smartopia.duckdns.org. However, if your Home Assistant is the latest version, the Home Assistant might complains a warning or error (depending on the version) about reverse proxy. This is solved by configuring the configuration.yaml file, as follows.
First, install the official file editor add-on from the Home Assistant Add-on Store and then open the add-on. Click the Browse Filesystem icon, choose configuration.yaml, and add the following to the file:
http:
  use_x_forwarded_for: true
  trusted_proxies:
    - 127.0.0.1
    - ::1
Now, save the file and restart Home Assistant (Configuration -> Server Controls -> Server management).
Optional Setup
Mosquitto Broker: The first one is to install a Mosquitto broker as an add-on, by simply going to Supervisor and then Add-on Store and search mosquitto broker, and then following the instruction for installation and starting the service.
File Editor: Another useful add-on is the official file editor. This is installed from the Add-on Store.
Terminal & SSH: This is another useful utility installed from Add-on Store.
HACS: Quoted from the HACS website: Home Assistant Community Store gives you a powerful UI to handle downloads of all your custom needs. I recommend to install HACS, by following the installation instructions there.
Broadlink Integration: This is used to control your old (dumb) appliances that can be controled by an IR/RF remote, such as air conditioner, TV, etc; this is not needed if the appliances are smart. The integration works together will a broadlink device. To install the integration, simply go to Configuration -> Integrations -> Add Integration and search for broadlink.