Nowadays most people use mobile phones and might not have a landline at home. However, sometimes it is convenient to call a home landline, e.g., to call domestic helper who does not have a mobile phone plan. An option is to purchase a landline from a provider and get a proper local landline phone number. Two drawbacks associated with this approach is: 1) fee per month, and 2) more importantly, spam calls even at midnight that waken everyone. Since this home phone is often intended to be called by a family member, it can be simulated by a SIP hard/soft phone and a PBX server. Below we will install FreeSWITCH, a popular PBX server, to a Raspberry Pi device.
Installation from Pre-built Package
Perhaps the easist way to install freeSWITCH is via pre-built release by the following commands.
sudo -i

apt-get update && apt-get install -y gnupg2 wget lsb-release
wget -O - https://files.freeswitch.org/repo/deb/rpi/debian-release/freeswitch_archive_g0.pub | apt-key add -

echo "deb http://files.freeswitch.org/repo/deb/rpi/debian-release/ buster main" > /etc/apt/sources.list.d/freeswitch.list

echo "deb-src http://files.freeswitch.org/repo/deb/rpi/debian-release/ buster main" >> /etc/apt/sources.list.d/freeswitch.list

apt-get update && apt-get install -y freeswitch-meta-all
At this point, freeSWITCH is installed and started, and its status can be checked by systemctl status freeswitch. If the status is not active, then the service can be restarted by systemctl restart freeswitch.
Installation from Source
We start by installing required dependencies and optional packages.
$ sudo apt -y update
$ sudo apt install -y git subversion build-essential autoconf automake libtool libncurses5 libncurses5-dev make libjpeg-dev libtool libtool-bin libsqlite3-dev libpcre3-dev libspeexdsp-dev libldns-dev libedit-dev yasm liblua5.2-dev libopus-dev cmake libavformat-dev libswscale-dev libpq-dev zlib1g-dev libcurl4-gnutls-dev libtiff-dev libsndfile-dev libgdbm-dev libdb-dev uuid-dev
$ sudo apt install -y libcurl4-openssl-dev libexpat1-dev libgnutls28-dev libx11-dev unixodbc-dev libssl-dev python-dev libasound2-dev libogg-dev libvorbis-dev libperl-dev
Next, we install another two required packages, namely, libks and signalwire, from source code.
$ sudo apt install -y cmake
$ cd /usr/src
$ sudo git clone https://github.com/signalwire/libks.git
$ cd libks
$ sudo cmake .
$ sudo make
$ sudo make install
$ cd /usr/src
$ sudo git clone https://github.com/signalwire/signalwire-c.git
$ cd signalwire-c
$ sudo cmake .
$ sudo make
$ sudo make installNow we ready to install FreeSWITCH itself. We use the verion 1.10.3, which we found to be stable and work well with Raspberry Pi. First, get the source code.
$ cd /usr/src
$ sudo wget https://files.freeswitch.org/freeswitch-releases/freeswitch-1.10.3.-release.zip
$ sudo unzip freeswitch-1.10.3.-release.zip
$ cd freeswitch-1.10.3.-release/
If the system complains that unzip or wget were not found, then use the command sudo apt-get install unzip wget to install them, and redo the above commands again. Next, we begin the installation process, which might take more 30mins to complete.
$ sudo ./configure -C
$ sudo make
$ sudo make install
If nothing goes wrong, then we proceed to install sounds.
sudo make all cd-sounds-install cd-moh-installNext, we create a new user and group to run FreeSWITCH, and set up right permissions.
$ cd /usr/local
$ sudo groupadd freeswitch
$ sudo adduser --disabled-password  --quiet --system --home /usr/local/freeswitch --gecos "FreeSWITCH Voice Platform" --ingroup freeswitch freeswitch
$ sudo chown -R freeswitch:freeswitch /usr/local/freeswitch/
$ sudo chmod -R ug=rwX,o= /usr/local/freeswitch/
$ sudo chmod -R u=rwx,g=rx /usr/local/freeswitch/bin/
We also create links for later use.
$ sudo ln -s /usr/local/freeswitch/bin/freeswitch /usr/bin/
$ sudo ln -s /usr/local/freeswitch/bin/fs_cli /usr/bin
We shall run FreeSWITCH as a service. For this, we create a new file called freeswitch.service with the following content, and save it to /etc/systemd/system/.
[Unit]
Description=freeswitch
Wants=network-online.target
Requires=syslog.socket network.target local-fs.target
After=syslog.socket network.target network-online.target local-fs.target

[Service]
Type=forking
Environment="DAEMON_OPTS=-nonat"
EnvironmentFile=-/etc/default/freeswitch
ExecStartPre=/bin/chown -R freeswitch:freeswitch /usr/local/freeswitch
ExecStart=/usr/bin/freeswitch -u freeswitch -g freeswitch -ncwait $DAEMON_OPTS
TimeoutSec=45s
Restart=always
RestartSec=90
StartLimitInterval=0
StartLimitBurst=6

User=root
Group=daemon
LimitCORE=infinity
LimitNOFILE=100000
LimitNPROC=60000
LimitSTACK=250000
LimitRTPRIO=infinity
LimitRTTIME=infinity
IOSchedulingClass=realtime
IOSchedulingPriority=2
CPUSchedulingPolicy=rr
CPUSchedulingPriority=89
UMask=0007
NoNewPrivileges=false

[Install]
WantedBy=multi-user.target
$ cd /etc/systemd/system
$ sudo chmod ugo+x freeswitch.service
$ sudo systemctl start freeswitch.service
$ sudo systemctl enable freeswitch.serviceNow we are ready to start the FreeSWITCH service.
Configuration
First, we make some changes to /usr/local/freeswitch/conf/vars.xml (or /etc/freeswitch/vars.xml) file. For example, we shall change the default password by modifying the value for default_password.
<X-PRE-PROCESS cmd="set" data="default_password=xxxx"/>where xxxx is replaced with a (strong) password of your choice. As we are going to run FreeSWITCH locally, we modify the values of external_rtp_ip and external_sip_ip in the vars.xml in the following way.
<X-PRE-PROCESS cmd="stun-set" data="external_rtp_ip=$${local_ip_v4}"/>
<X-PRE-PROCESS cmd="stun-set" data="external_sip_ip=$${local_ip_v4}"/>
We also disable autoloading the signalwire module by commenting the following line out in /usr/local/freeswitch/conf/autoload_configs/modules.conf.xml (or /etc/freeswitch/autoload_configs/modules.conf.xml)
<!-- <load module="mod_signalwire"/> -->To check the status, we can use the command sudo systemctl status freeswitch.service, and we will see the following message:

Now the FreeSWITCH is up. There are 20 default users, with number between 1000 and 1019 and password we set up in the /usr/local/freeswitch/conf/vars.xml file. Additional configuration to SIP accounts, such as creating/modifying accounts, can be found here.
SIP Client
To test the FreeSWITCH service, we need at least two so-called SIP clients. Here we use linphone, a free, open-source and cross-platform SIP clients that are available in Mac OS, Windows, and iOS/Android. From the main memu, we select ASSISTANT -> USE SIP ACCOUNT, and then provide the following information to the displayed form.
- Username: a number between 1000 and 1019; more options are available if additional accounts are configured for FreeSWITCH;
- Display name: the name you want to display in the SIP client;
- Password: the password associated with the above username. If no additional configuration is made to FreeSWITCH, then for the default accounts 1000 – 1019, it is the password we set in /usr/local/freeswitch/conf/vars.xml file;
- SIP domain: the IP address of the Raspberry device on which FreeSWITCH is running. Later, if we set up a port forward in the home router, it could be the public IP address or domain of the router.
- Transport: UDP

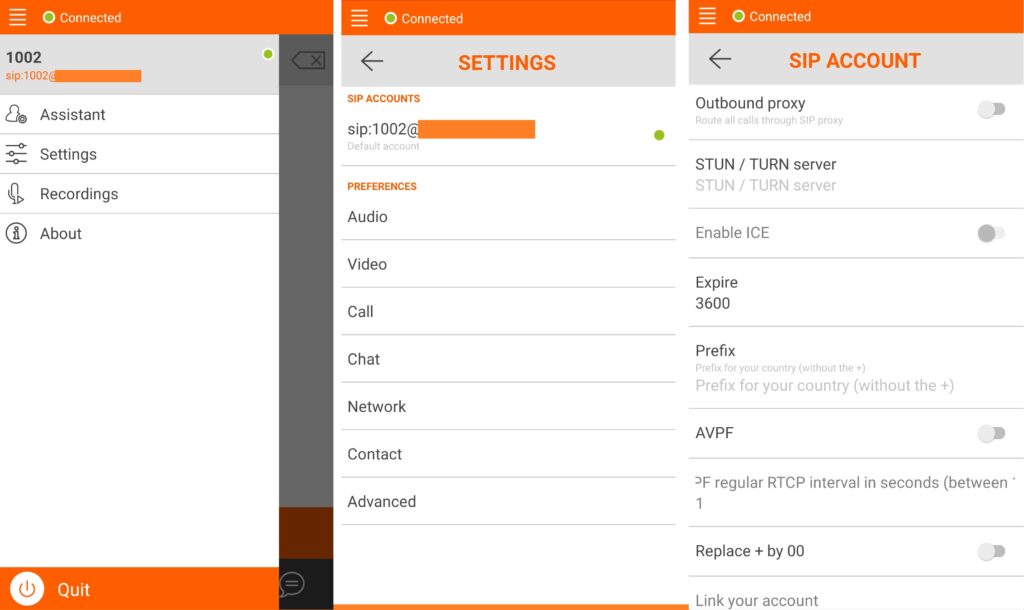
For the android version of linphone, it is important to make sure that main menu -> Settings -> SIP Accounts -> Prefix is blank; otherwise, there might be a problem for audio input/output. Other free SIP clients include Sipdroid, GS Wave and ZoiPer, among many others. Here, we set up a client on a Windows laptop with number 1000, and one on an Android phone with number 1001. To dial each other, simply open the linphone app and dial the corresponding number, e.g., 1000.
It is also possible to have a SIP hardphone, see here for more information. Here, we tried a Fanvil X4U phone and it works perfectly.
Access from Outside of Home Network
If VPN is used in your laptop or mobile phone, and the SIP client (e.g., linphone) is configured to use the VPN as in the previous post, then no additional configuration is needed for remote access from outside of home network. Otherwise, we can create a port forward rule in the home router, as shown in the following picture, where the IP address 192.168.1.68 is to be replaced with the IP address of your device on which FreeSWITCH is running. In addition, when we configure a SIP account in the SIP client, for the SIIP domain, we shall use the public IP address of the home router, or the router’s domain name if DDNS is in use.
